Loved a recipe? Have a question? Please share a comment. 🙂
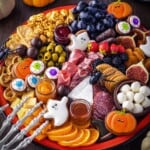
This Halloween Charcuterie board may look fancy, but is super simple to put together! It comes together in about 15 minutes using store-bought cookies, fresh fruits, cheeses, and sliced meats.

Table of Contents
Why You’ll Love This Halloween Charcuterie Board
- Quick & Easy. If you’re looking for a Halloween food idea that doesn’t require much prep work, this charcuterie board may be the answer. It only takes about 15 minutes to put together and is made with ingredients you can find at the grocery store. In other words, no cooking or baking required!
- Impressive. Charcuterie boards are the king of impressive-yet-low-effort fare because they can be fully assembled with pre-made and fresh ingredients.
- Flexible. You can customize this Halloween snack platter according to your tastes. Not a fan of olives? Use baby dill pickles, sun dried tomatoes or even a different color grapes. Can’t find caramel corn? Just make regular popcorn and use that instead. The possibilities are endless!
What Is a Charcuterie Board?
A charcuterie board is essentially an appetizer that has a variety of cheeses, meats, fruit, crackers, and other ingredients on it. Typically the food is arranged on a wooden board in a way that is inviting and beautiful to look at. Charcuterie is pronounced (shar-KOO-ta-REE). It’s a French word and the concept of these boards arranged with a variety of foods dates back to the 15th century.

What’s a Charcuterie Board Made Of?
One of the best things about charcuterie boards is how easy they are to customize to your specific tastes. Here is a quick overview of what is typically included on a board:
- Meat – A variety of sliced meats like salami and prosciutto.
- Cheese – Different kinds of cheeses. I like to use a mix of hard cheeses and soft cheeses.
- Crackers – These are perfect for stacking the meat and cheese on, then adding a dollop of sauce or jam.
- Fruit or veggies – Use your favorites. Grapes, berries, fresh figs, carrot spears, olives, etc. You can also use dried fruit.
- Dips and jams – I like to include jam with my charcuterie boards because their sweetness compliments the saltiness of the meats and crackers. You can also add things like hummus, or a cheese dip.
- Nuts – You can add nuts to charcuterie boards as well. I didn’t add any here, but walnuts, almonds and shelled pistachios are all great additions for a board.
Additional Things to Add:
- Cookies – A typical charcuterie board will only have the items mentioned above, but I like to add fun decorated cookies. This is especially true for holiday-themed charcuterie boards. You can usually find cute cookies at the market around the holidays, which makes adding them to your board extra easy!
- Candy – I also usually add a few candies to my holiday boards. Why not?
In addition to the edible items, I recommend using some simple decorations to give your charcuterie board a bit of flair. For example, for this Halloween board I used plastic spiders and skeleton hands.

What Did I Use for This Halloween Charcuterie Board?
- Dried apricots
- Fresh fruit: Sliced figs, orange slices, blackberries, grapes, strawberries and olives.
- Cheese: A wedge of brie cheese, sliced cheddar, and mozzarella cheese balls.
- Sweeteners: Apricot jam, raspberry jam, and honey in little jars. These are great for drizzling on top of a cracker with meat and cheese, for example.
- Crackers: Water crackers, ritz-style crackers, and pretzels.
- Meat: Prosciutto and salami.
- Sweets: Caramel corn, ghost cookies, eyeball cookies, witch cookies, and pumpkin cookies. I also added some dark chocolate candy balls and Twix-style candies from the natural foods market.
How much will you need of each? That totally depends on how big of a board you are making.
I always recommend buying a bit extra so that you can be sure to have enough items to fill your board. Whatever doesn’t make it onto the board can be used to fill in gaps as guests eat through the offerings, or can be used at a later date.
How to Make a Halloween Charcuterie Board
Assembling a charcuterie board is incredibly simple. Basically, you get your board and arrange everything on it. That’s it! Here’s a step-by-step breakdown:
- Choose your board. This doesn’t even need to be a “board” it can also be a large serving platter like I used here. (Because it had fun Halloween colors.) I have also used my wood cutting board for charcuterie in the past.
- Add the cheese. Start by adding the cheese to your serving platter/board. Since the cheese usually comes in blocks, it takes up a nice amount of space and so I add it to the board first and then arrange everything around it.
- Fold and add the meats. Arrange these next to the cheeses.
- Add the jars of jam/honey. Nestle these on the other side of each block of cheese, opposite the meat.
- Place the crackers on the board. Now it’s time to add the crackers, pretzels and other bready items.
- Fill in the empty spaces with fruit. Arrange your fresh/dried fruit in the empty spaces.
- Add cookies and candy. Lastly, nestle your cookies and candies into the nooks and crannies between everything else.
Tada! You just made an impressive Halloween charcuterie board. 🙂

Tips for Success
- Have fun with it. I find that folks can get really stressed out about the idea of making a charcuterie board pretty. The truth is that once your guests start digging in your design will quickly disappear and everyone will just be enjoying munching on all the goodies you put together.
- Make it colorful. Especially for a Halloween charcuterie board, I feel like color is important. Choose colorful fruits, jams, cookies, and more.
- Use decorations. Part of setting the mood for a Halloween charcuterie board is the decorations. I used plastic spiders and skeleton hands here, and then put small pumpkins around the board. Make sure you only use decorations that won’t impart anything to the food. For example, don’t use gooey Halloween decals or something like that.
- Where to find things for your board? Most of the items on my board are from the regular grocery store. I did go to a natural foods market nearby for the cookies and candies because I know they usually have fun finds this time of year. Trader Joes is another great place to go for unique charcuterie board ingredients.
How to Store Extras
There are rarely extras left over, but if you do have some you can store the fruits separately in airtight containers in the fridge. The cookies and crackers can likewise be stored for a day or two, provided they were not touching any meat or cheese. The meat and cheese I would not recommend saving for later since they will have been sitting out for a while by the time your party is over.
More Halloween Party Food Ideas

Halloween Charcuterie Board
Ingredients
Fruits
- Dried apricots
- Sliced figs
- Orange slices
- Blackberries
- Grapes
- Strawberries
- Olives.
Cheese
- A wedge of brie cheese
- Cheddar cheese cubes
- Mozzarella cheese balls.
Sweeteners
- Apricot jam
- Raspberry jam
- Honey
Crackers
- Water crackers
- Ritz-style crackers
- Pretzels.
Meat
- Prosciutto
- Salami
Sweets
- Caramel corn
- Assorted cookies, ideally decorated with a Halloween theme
Candies
- Mini Twix bars, Kit Kats, or whatever kind of candy you like
Instructions
- Choose your board. This doesn't even need to be a "board" it can also be a large serving platter like I used here. (Because it had fun Halloween colors.) I have also used my wood cutting board for charcuterie in the past.
- Add the cheese. Start by adding the cheese to your serving platter/board. Since the cheese usually comes in blocks, it takes up a nice amount of space and so I add it to the board first and then arrange everything around it.
- Fold and add the meats. Arrange these next to the cheeses.
- Add the jars of jam/honey. Nestle these on the other side of each block of cheese, opposite the meat.
- Place the crackers on the board. Now it's time to add the crackers, pretzels and other bready items.
- Fill in the empty spaces with fruit. Arrange your fresh/dried fruit in the empty spaces.
- Add cookies and candy. Lastly, nestle your cookies and candies into the nooks and crannies between everything else.