
Loved a recipe? Have a question? Please share a comment. 🙂
Soft and buttery, this orange-flavored pan de muerto is an iconic Mexican pan dulce. Sprinkled with sugar for added sweetness, it’s perfect for dipping into hot chocolate this upcoming Day of the Dead.

Why You’ll Love This Pan de Muerto Recipe
Pan de muerto is a citrusy Mexican sweet bread only made in the weeks leading up to Day of the Dead. It’s one of my favorite Mexican recipes to make in the fall!
- Easy. The hardest part of this recipe is waiting for the dough to rise. Other than that, this is a simple yeasted bread recipe that uses some of the dough to make shapes on top of the finished pan dulce. I know it looks fancy, but trust me – if you have ever played with Play-Doh you can make the bone shapes on top of these delightful little breads.
- Perfect texture. The finished pan dulce is soft and airy with a lovely golden exterior. The insides are tender with subtle hints of orange zest and orange blossom water.
- So delicious. The finished pan de muerto has a bit of crunch on the outside from the sugar, then is fluffy on the inside. They’re so satisfying! Plus, few things are as comforting as dunking a piece of this pan dulce into hot chocolate or coffee. Don’t believe me? Even spirits come back every year to grab some pan de muerto.

What is Pan de Muerto?
Pan de muerto, also known as Day of the Dead Bread, is a seasonal Mexican sweet bread specially made for Day of the Dead. In English the name means “bread of the dead.”
Why do people make pan de muerto? It’s an offering that’s placed at a loved one’s altar or tombstone every November 1st and 2nd, honoring their departure. When your loved one’s spirits arrive on Day of the Dead (Dia de los Muertos), they can feast on the bread and any other foods you placed at the site while you rejoice in each other’s company.
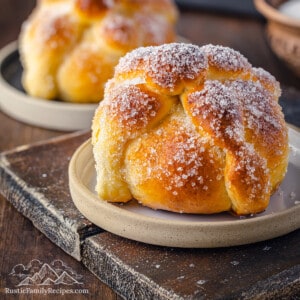
The shape of pan de muerto is round, representing the cycles of life and death. The central “ball” symbolizes the dead’s “skull,” their memories, and wisdom. The other four decorations are supposed to be their “bones.”
Types of Pan De Muerto
There are 5 main types of pan de muerto, with even more regional variations. Some of them are iced, others are sprinkled with sesame seeds, and some are even shaped like people. I make the most traditional one, though. It’s from Mexico City and has become the face of pan de muerto all over the country. This pan de muerto is round and topped with a “skull” and “bones”.
What Does Pan de Muerto Taste Like?
Pan de muerto isn’t excessively sweet. It’s a light and airy bun that still manages to be incredibly rich. The orange blossom water adds a subtle and elegant aromatic component to every bite. It’s like your nose picks up on the flavor before your mouth does, making it a real sensory experience. Since the bread is dipped in butter and sprinkled with sugar it also has a bit of crunch.

What You’ll Need
With only 10 ingredients, you’ll be surprised how easy it is to make this age-old tradition and get your kitchen smelling amazing. Be sure to scroll down to the recipe card for ingredient amounts.
For the bread
- All-purpose flour – This is the most common type of flour used for baking in Mexico, but you can also use bread flour.
- Active dry yeast + water
- Evaporated milk – It adds a subtle sweetness and creaminess that I love, but whole milk works too.
- Granulated sugar – White or light brown sugar both work.
- Kosher salt
- Unsalted butter – I recommend using unsalted butter. However, if you only have salted butter, then leave out the salt that’s added separately.
- Eggs – Preferably at room temperature.
- Orange zest – Lemon zest is a good substitute. It will change the flavor slightly, but will maintain the bread’s citrus notes.
- Orange blossom water – I usually find it at specialty baking stores or online. If you can’t get a hold of it, substitute it for 2 teaspoons of vanilla extract.
For topping
- Whisked egg
- Granulated sugar
- Unsalted butter – If you already used salted butter in the dough, refrain from using it again for brushing. Your pan de muerto might turn out salty.
How to Make Pan de Muerto
Here’s a quick look at how to make Day of the Dead Bread. Be sure to scroll down to the recipe card for detailed instructions.


- Prepare the tray. Line a baking tray with some parchment paper. Set it aside.
- Make the dough. Proof the yeast, then add the remaining dough ingredients until you have a soft ball of dough that springs back when you gently press on it with your thumb.


- Let the dough rise. Cover the bowl with plastic wrap and let it rise until doubled in size.
- Shape the buns, then let rise. Divide the dough into 4 equal parts. Reserve one part to make the “skull” and “bones.” Use your hands to form 8 equal-sized balls. Arrange them on the prepared baking tray, leaving 4-5″ of space in between them. Cover the buns with a clean kitchen towel and let the pan de muerto rise for another 30 minutes.


- Make the skulls and bones. Roll the dough into 8 little balls and 16 strips. Place them on another parchment-lined tray and refrigerate for 1 hour. Don’t skip this step or they’ll sink into the bread during baking.
- Add to the buns and bake. Assemble the buns by crossing two strips in an “x” shape down the center. Press one of the “skulls” or balls in the center of the “x” until it sticks. Brush the buns with egg-wash. Pop the pan de muerto into the oven until golden brown.
- Add sugar. Wait about 5 minutes after taking them out of the oven and then dip them in melted butter. You can also brush it on. Then immediately sprinkle with granulated sugar. Let them come to room temperature before eating. Enjoy!

Tips For The Best Pan de Muerto
Follow these tips to pay your respects to good bread-baking and pan de muerto:
- Use an oven-thermometer. Bread-baking is extremely temperature-sensitive. When the internal temperature is just a few degrees off, it can be devastating. Avoid greasy, dense, and rubbery bread by using an oven-thermometer to make sure the oven is properly heated.
- Add a tray of water. Pour some water into a tray and place it on a lower rack in the oven. This will create steam and keep your bread’s exterior soft as it bakes.
- Don’t let it cool. Don’t let the buns cool before dunking them into the melted butter and sprinkling them with sugar. Once the temperature lowers, the butter and sugar don’t adhere to the bread well.
- Add some cinnamon. Make a cinnamon-sugar mixture and use it to sprinkle your pan de muerto with. It’s not as traditional but still adds a very fall-themed flavor.

How to Store
- Counter. You can store them in a paper bag at room temperature for up to 2 days. If the weather in your area is very humid, though, or you’d like to store them for longer, place them in an airtight container at room temperature. They will keep for up to 5 days when stored this way.
- How to warm them up. Right around the third or fourth day, they will begin to stiffen. That’s okay. All you have to do is give them a light spritz of water and pop them into the toaster oven preheated to 300F. Heat them for a couple minutes until warm. They’ll taste like freshly baked bread again!
Can I Freeze It?
Of course! Here’s how to do it:
- Before baking: This is a great way to enjoy pan de muerto all year. Place the raw, shaped buns (with the bones) on a parchment-lined tray. Make sure you don’t let them rise. Pop them into the freezer for at least 4 hours or until completely frozen. Then wrap each pan de muerto in plastic wrap. Transfer them to a freezer-friendly bag or container and freeze for up to 3 months. A day before you’re ready to eat them, unwrap each piece and place in the fridge overnight. The next morning, let them finish thawing at room temperature and continue with the recipe as usual.
- After baking: Place the cooled pan de muerto on a parchment-lined tray and freeze the bread for at least 4 hours. Once completely frozen, wrap them with plastic wrap. Transfer them to a freezer-friendly bag or container. Freeze for up to 4 months. Set them on the counter and let them come to room temperature when you’re ready to eat them.
More Mexican Desserts to Try
- Mantecadas
- Puerquitos
- Conchas
- Carlota de Limón
- Señorita Bread
Pan de Muerto (Day of the Dead Bread)
Ingredients
- 1 tablespoon active dry yeast
- 2 tablespoons warm water + 1 teaspoon sugar
- 4 cups all-purpose flour
- ½ cup granulated sugar
- ½ teaspoon salt
- 3 eggs, divided use
- 3 tablespoons unsalted butter, melted and cooled
- ¾ cup evaporated milk, or whole milk
- 2 tablespoons orange zest
- ½ teaspoon orange blossom water, or vanilla extract
- Unsalted butter, melted, for finishing the buns
- Granulated sugar, for sprinkling on the finished buns
Instructions
- Prepare the baking tray. Line a baking tray with parchment paper and set it aside.
- Activate the yeast. Whisk the warm water, one teaspoon of sugar, and yeast until well combined. Set it aside in a warm place for 15 minutes or until frothy. If the yeast doesn't activate, it's likely "dead" and you will need to repeat this step.
- Whisk the dry ingredients. In a large bowl, mix the flour, sugar and salt until well combined.
- Make the dough. Make a well in the center of your dry ingredients and pour in the activated yeast mixture. Then add 2 eggs, butter, evaporated milk, orange zest, and orange blossom water. Mix until a rough dough forms.
- Knead. Dust your counter with flour, then turn out the dough and knead for 15-18 minutes, occasionally slapping the dough against the counter to further develop the gluten. If the dough becomes stick you can dust it with more flour. When the dough is smooth, soft, and doesn't stick to your fingers anymore, it's ready.
- Rise. Place the dough in a large bowl and cover it with a clean kitchen towel or plastic wrap. Set it aside to rest in a warm place for an hour, or until doubled in size.
- Shape. Divide the dough into 4 equal parts and reserve a quarter for the "bones" on top of the bun. Use the rest of the dough to form 8 equal pieces and roll them into balls. After that, arrange them on the baking tray lined with parchment paper. Leave about 4-5" of space in between each piece. Cover the tray with a clean kitchen towel and let the buns rise for 30 minutes, or until doubled in size.
- Make the bones. Divide the reserved piece of dough into 8 little balls and 16 strips a little bit shorter than the diameter of the buns. Place the strips and little balls in another tray lined with parchment paper and refrigerate them for 1 hour.
- Make the egg wash. Whisk the remaining egg with 1 teaspoon of water. Set aside.
- Bake. Preheat the oven to 350 F. Cross two strips in an "x" over the center of the bun. Lightly press a little ball of the dough down the center of the "x" until it sticks. Gently brush the egg-wash over them and bake the buns for 20-25 minutes or until golden brown and fluffy.
- Finish with butter and sugar. Fresh out of the oven, melt some unsalted butter for brushing. Brush it onto the buns on all sides and then generously sprinkle them with sugar all over. Let them come to room temperature and enjoy.
Notes
- Don’t forget to refrigerate the “bones” or they will sink into the buns completely during baking.